Introduction
To secure iSCSI connections, Mutual CHAP (Challenge-Handshake Authentication Protocol) can be used to authenticate iSCSI initiators and targets. In this blog, we'll explore how to configure iSCSI Mutual CHAP on Red Hat Enterprise Linux 9.x (RHEL 9.x) using Virtual Storage Platform One Block 20.
What is CHAP (Challenge-Handshake Authentication Protocol)?
CHAP is an authentication protocol that verifies the identity of a user or a host to a remote entity. Unlike simple password-based methods, CHAP never sends the actual password over the network. Instead, it uses a challenge-response mechanism to ensure secure authentication.
This method helps protect against replay attacks and eavesdropping because the challenge changes each time a connection is made, and the password itself is never transmitted.
iSCSI Components
- iSCSI Initiator: The client (in this case server with RHEL 9.x) that connects to storage VSP One Block 20.
- iSCSI Target: The storage VSP One Block 20 that provides disk resources over the network.
When used with iSCSI, CHAP provides two modes:
- One-way Authentication: The initiator (host) proves its identity to the target (storage device). This is the most common configuration and ensures that only authorized clients can access the storage.
- Mutual Authentication: Both the initiator and the target authenticate each other. This adds an extra layer of security by ensuring that the storage device is also a trusted entity, protecting against rogue servers.
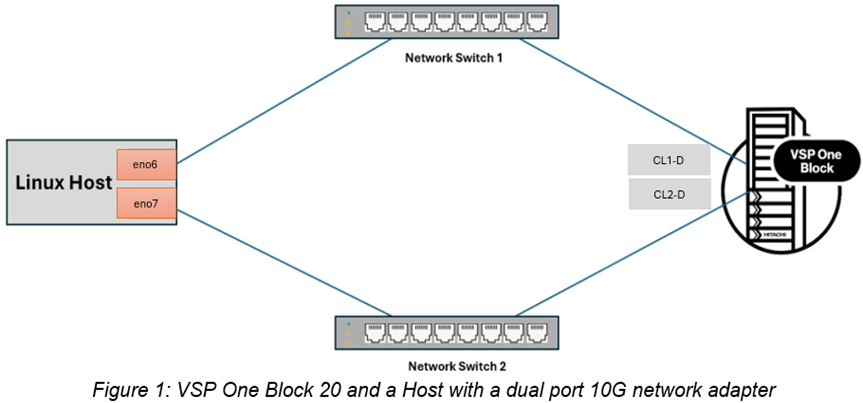
Block Diagram
The following figure shows VSP One Block 20 and a Host with a dual port network adapter. One of the NIC ports is connected to VSP One Block 20 Target port CL1-D, and the other NIC port is connected to the CL2-D port.
IP addresses of the Linux Host NIC ports and storage ports are as follows:
· Ethernet Port (NIC1): 192.168.1.10
· Ethernet Port (NIC2): 192.168.10.10
· VSP One Block 20 10G iSCSI Port CL1-D: 192.168.1.20
· VSP One Block 20 10G iSCSI Port CL2-D: 192.168.10.20
Note:
1. OS – RHEL 9.x is local boot.
2. Configuration for iSCSI initiator (eno6) with iSCSI target (CL1-D) are shown. Please repeat the same procedure for the alternate path (i.e. eno7 and CL2-D an) in setup.
VSP One Block 20 iSCSI Target Configuration
This section describes how to configure iSCSI target ports on VSP One Block 20.
VSP One Block iSCSI is configured with CCI. VSP One Block Administrator UI does not have the CHAP configuration option. You can set CHAP using the CCI ‘raidcom’ command.
To configure iSCSI target ports on VSP One Block 20, complete the following steps:
1. Assign IP address in the CL1-D iSCSI target ports using the following CCI raidcom commands:
# raidcom modify port -port <port> -ipv4_address <address> -ipv4_subnetmask <subnet mask> <horcm_instance>
2. Validate the IP address as follows:
#raidcom get port -port <port> -key opt <horcm_instance>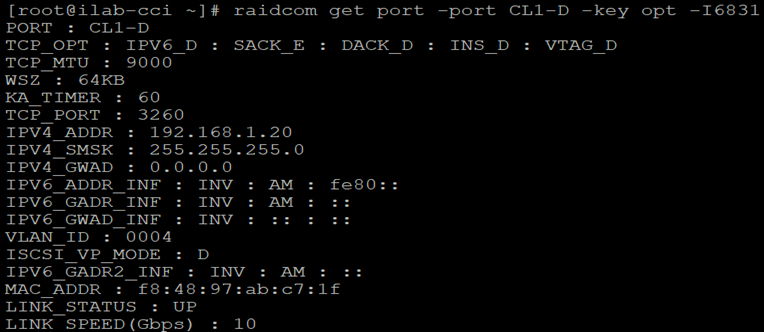
3. Configure the iSCSI target on VSP One Block 20 storage ports.
a. Validate whether any existing iSCSI target is present on CL1-D as follows:
# raidcom get host_grp -port <port> <horcm_instance> 
b. Add the iSCSI target with target name (for example, ‘CVD’), modify the target by enabling Mutual CHAP authentication and validate whether iSCSI target is created, as follows:
# raidcom add host_grp -port <port> [<host group name>] -host_mode <host mode> <horcm_instance>

# raidcom modify host_grp -port <port> <host group name> -host_mode <host mode> -authmethod BOTH -mutual enable <horcm_instance>

# raidcom get host_grp -port <port> <horcm_instance>
4. Create CHAP authentication users on VSP One Block 20.
a. Add an initiator chap user (for example, ‘user1’) as follows:
# raidcom add chap_user -port <port> -initiator_chap_user <user_name> <horcm_instance>

b. Add a target chap user (for example, ‘user2’) as follows:
# raidcom add chap_user -port <port> -target_chap_user <user_name> <horcm_instance>

c. Validate whether the CHAP users were created as follows:
#raidcom get chap_user -port <port> <horcm_instance>

d. Set CHAP secret for both initiator and target chap user created in the previous step for authentication, as follows:
# raidcom set chap_user -port <port> -initiator_chap_user <user_name> -secret <horcm_instance>

# raidcom set chap_user -port <port> -target_chap_user <user_name> -secret <horcm_instance>

Note: Enter a value for the secret.
The characters are not displayed on the screen. Give different secrets for target and initiator. Make a note of this secret because you will use it while configuring the initiator iscsi login configuration file ‘iscsid.conf’.
5. Add iSCSI Host (iSCSI initiator) IQN (iSCSI Qualified Name) to iSCSI targets on the VSP One Block 20 iSCSI interface.
a. Obtain initiator IQN from the ‘/etc/iscsi/initiatorname.iscsi’ file on the Linux host to add iSCSI Host IQN to iSCSI target as follows:
# raidcom add hba_iscsi -port <port> -hba_iscsi_name <hba_iscsi_name> <horcm_instance>

Note: If you are unable to get the file ‘/etc/iscsi/initiatorname.iscsi’, use the below commands:
· systemctl enable iscsid
(It will give an output like: Created symlink /etc/systemd/system/multi-user.target.wants/iscsid.service → /usr/lib/systemd/system/iscsid.service)
· systemctl start iscsid
· cat /etc/iscsi/initiatorname.iscsi
(It will generate the required initiator name. example: InitiatorName=iqn.1994-05.com.redhat:b7ae72ee7236
b. Validate the assigned iSCSI initiator to iSCSI targets as follows:
# raidcom get hba_iscsi -port <port> <horcm_instance>
6. Provision and map LUNs to the VSP One Block 20 iSCSI target as required.
7. Obtain the iSCSI Target IQN information as follows:
# raidcom get host_grp -port <port> <horcm_instance>
Note: You will need this information to configure the iSCSI initiator host.
The output of the identified target IQN from the command is as follows:
· Target IQN (Port CL1-D, Group name ‘CVD’):
iqn.1994-04.jp.co.hitachi:rsd.has.t.10005.1d001
Configuring iSCSI CHAP on RHEL 9.x
To configure RHEL 9.x iSCSI Hosts, complete the following steps:
1. Verify that the iSCSI initiator package is installed in the Linux operating system; if not, install it.
Example for RHEL 9.x:
2. Configure IP addresses on the 10G Network Adapter ports, which will connect to iSCSI storage ports, and verify that the storage ports are reachable.
Set IP addresses on Ethernet ports that will be used for storage iSCSI target connectivity. Ethernet port: eth6 IP address: 192.168.1.10
You can set IP addresses using the ‘ip addr add’ command, as follows. To make it permanent, follow the OS configuration guides.
# ip addr add 192.168.1.10/24 dev eno6
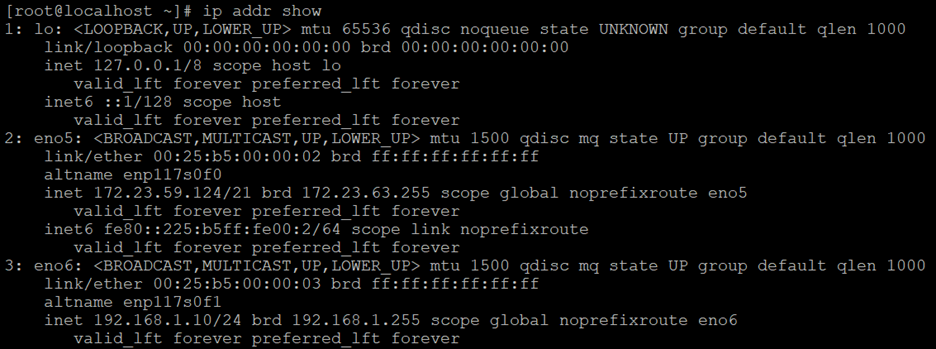
3. Verify that target iSCSI ports are reachable from the host.
Storage Target ports CL1-D have the following IP address:
iSCSI target port: CL1-D IP address: 192.168.1.20
4. Configure the iSCSI service on the Linux host to start during boot.
For RHEL 9.x:
# systemctl enable iscsid.service
Created symlink /etc/systemd/system/multi-user.target.wants/iscsid.service â /usr/lib/systemd/system/iscsid.service.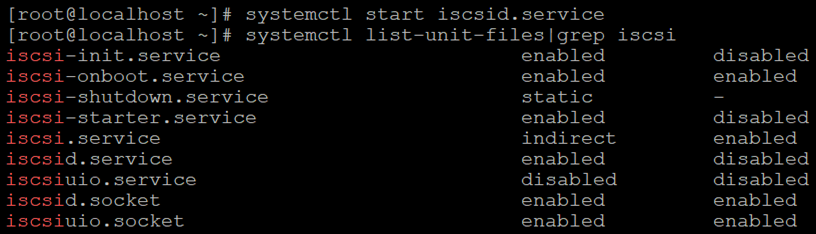
5. Obtain the initiator IQN (iSCSI qualified name). After enabling iSCSI daemon, obtain the initiator IQN from the /etc/iscsi/initiatorname.iscsi file on Linux Hosts.
Example for RHEL 9.x Host/initiator IQN:
6. Configure the /etc/iscsi/iscsid.conf iSCSI configuration file in Linux Host.
a. To request that the iSCSI service scripts startup a session, use automatic as follows:
node.startup = automatic
b. To enable CHAP authentication, set node.session.auth.authmethod to CHAP. The default is None.
node.session.auth.authmethod = CHAP
c. To set a CHAP username and password for initiator authentication by the targets and for target authentication by the inititaor, uncomment the red highlighted lines:
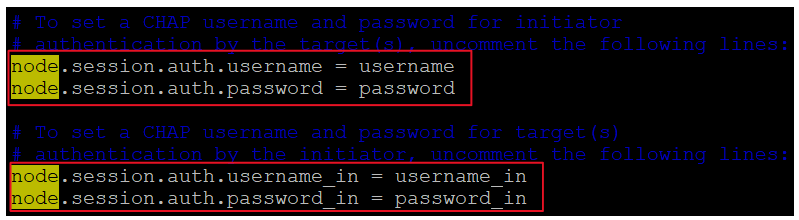 Enter the correct CHAP username and password that you created on iSCSI storage for CHAP authentication.
d. Use the following digest settings for RHEL 9.x:
Header digest:
· For Red Hat Enterprise Linux: None
Data digest:
· For Red Hat Enterprise Linux: No specification is required.
e. Uncomment the following line in the configuration file for checking digest:
node.conn[0].iscsi.HeaderDigest = None
7. Configure iface to be used for iSCSI connectivity by running the ‘iscsiadm -m iface’ command. You can create the files manually or using commands.
Note: Before creating iface, note down the MAC or hardware address of the ethernet port eth6.
To create iface, run the following command:
iface files are created in the following directories for RHEL 9.x:
/var/lib/iscsi/ifaces
8. Run iSCSI target discovery.
a. Start iSCSI target discovery.
b. Log-in to iSCSI target using a node record ID found by the discovery:
iSCSI target discovery to iSCSI storage port CL1-D (192.168.1.20):
This node discovery creates /var/lib/iscsi/nodes and /var/lib/iscsi/send_targets in RHEL 9.x with discovery and node tables. 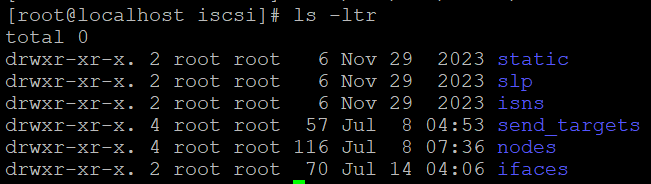
9. Restart the system and verify that LUNs are detected on the host. Enable and configure multipath as required. For detailed multipath configuration, see the respective configuration manual.
10. Start the multipath service.
RHEL 9.x:
# /sbin/mpathconf –-enable
# systemctl enable multipathd
# systemctl start multipathd
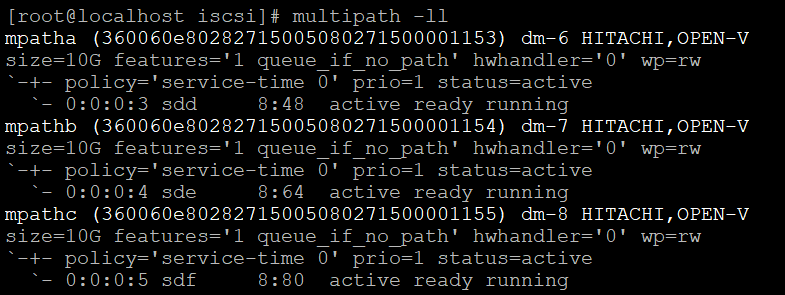
Multipath command output from RHEL 9.x:
# multipath -ll