Author: @Bhakta Sahoo
Introduction
This blog provides a detailed overview of the installation, configuration, and volume scanning process in Index Engine’s CyberSense.
CyberSense is a cybersecurity and data integrity software solution developed by Index Engine. It is designed to detect ransomware attacks, data corruption, and other malicious activities in block data by analyzing Thin Image Advanced safe snaps.
Environment
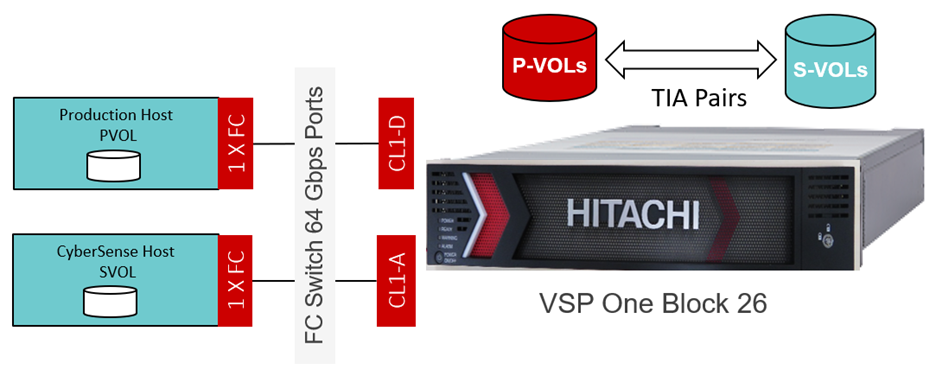
Figure 1: Index Engine environment
Figure 1 shows the setup used for the Index Engine environment.
The following components have been used for the above setup.
Hardware Configuration:
Production Host: HA820 G2
CyberSense Host: HA820 G2
Storage: Hitachi VSP one Block 26
Software Configuration:
CyberSense version: 8.15.2515-1.0
Production Host: User data volume (PVOL) is mapped to Production Host. Then user volume (PVOL) is partitioned and filesystem (xfs, ext4 etc.) is mounted on the production host. Host IO is executed on the Production volumes (PVOL).
CyberSense Host: CyberSense software is installed on this Host, and SVOL is mapped to CyberSense Host during Policy execution. After the scan is complete, SVOL is unmounted automatically. CyberSense Host does the scanning of the TIA snapshot data.
CyberSense Installation:
The following steps are for the installation of CyberSense.
1. Copy the CyberSense installation tar file (using WinSCP or your preferred tool) to the server.
2. SSH to the server.
3. Navigate to where you copied the file and then extract the content (e.g. tar -xf indexengines-hitachi-8.13.0-1.18-el9.x86_64)
4. Begin the installation: sh install_ie *.rpm 2>&1 | tee log
5. Set password for CyberSense’s admin account: /opt/ie/bin/iepasswd admin
Note: You can refer to the "IndexEngines_CS_Installation_Guide" for detailed information on server requirements and recommendations.
License:
To enable CyberSense licensing, the following information is required to generate the license key.
Ø Project: Project name
Ø Engine ID: MAC address of port without colon (:)
Ø Hostname: Hostname of server
Ø IP address: N/W port IP of server
Policy Creation:
Policy is created to index and analyze data on volumes that are block-based or VMware VMFS datastore volumes. CyberSense scans the TIA snapshot data created from the PVOL and SVOL specified in the policy.
To create a policy in CyberSense - Open the CyberSense UI in any web browser using the CyberSense host IP address, then navigate to the "Policies" tab to create policies for either FC/iSCSI-based volumes or VMFS-based volumes, based on the environment.
The following details must be provided for Block (FC/iSCSI) based volumes or VMFS-based volumes:
- Policy Name: Assign a relevant name for the policy (maximum of 14 characters).
- Hitachi Virtual Storage Platform Hostname or IP Address: Enter the Storage Controller (CTL) IP address.
- Connection Option: select the appropriate option for the connection between the CyberSense server and the Hitachi storage array:
- Fiber Channel - select if the connection is Fiber Channel.
- iSCSI - Select if the connection utilizes an existing Ethernet infrastructure.
- Job Type: select Block/VMFS as the storage type that is used on the host
- CyberSense Server Hostgroup Name: select the name of the Ransomware Detection server hostgroup on the VSP storage.
- Production Hostgroup Name: Select the appropriate hostgroup name for PVOL.
- Primary Volume(s) ID: Select the appropriate PVOL ID for the source volume.
- Secondary Volume(s) ID: Provide a non-existent SVOL ID, converted to its hexadecimal format.
- Safe Snap Retention Period: a specific number of hours or days in which to retain and protect the safe snapshot. During the retention period, snapshot data can’t be modified or deleted by an external user, which prevents accidental deletion of snapshot data.
- Datastore UUID: enter the UUID of the datastore for job type VMFS.
- Virtual Machines: Include or exclude specific Virtual Machines from scanning for job type VMFS.
- Schedule: Set the policy schedule as required—either hourly or daily.
o Hourly: Policy runs at every specified interval of the day.
o Daily: Policy runs on specified day(s) and time of the week.
- Original Data Location: specify the hostname/path to the source data location
Sample FC Policy Configuration:
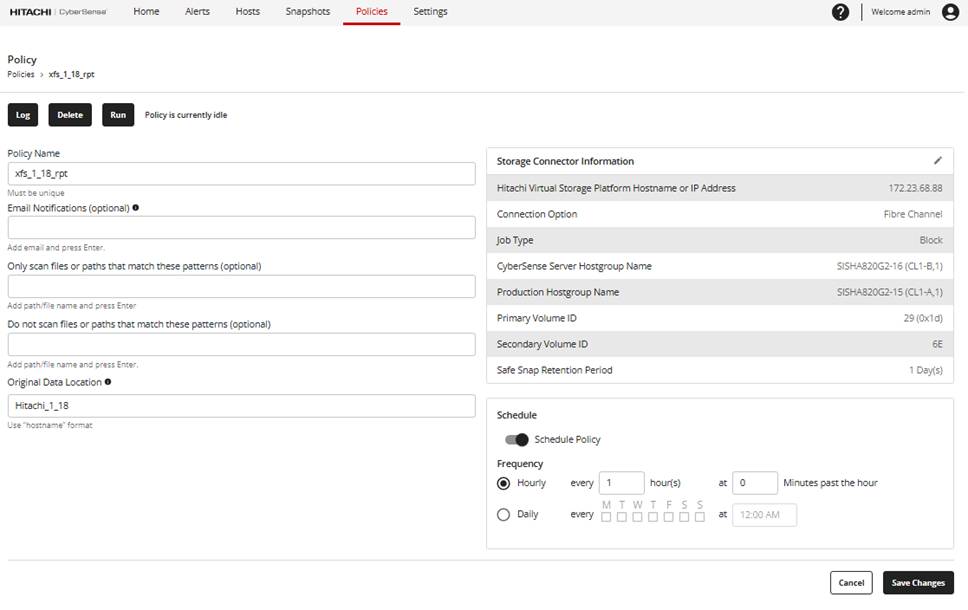
Figure 2: Sample FC policy
Figure 2 shows the sample FC policy and required details.
Sample VMFS Policy Configuration:
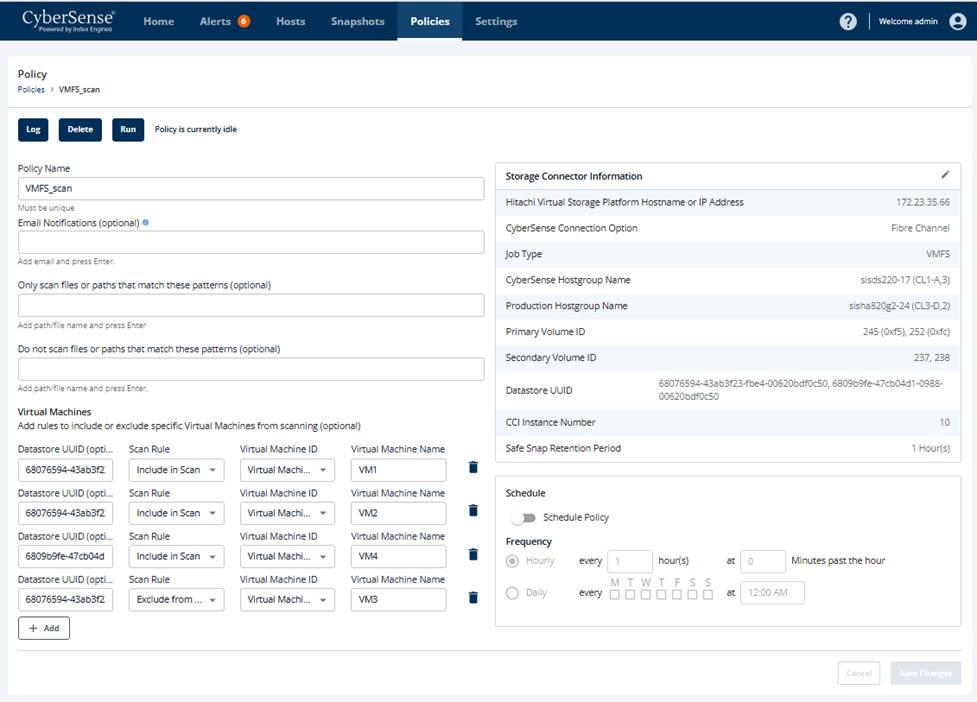
Figure 3: Sample VMFS policy
Figure 3 shows the sample VMFS policy and required details.
Policy Management:
In the “Policies” tab, policies can be created, run, viewed, modified, and deleted. In the 'View Policy Log' section, click on a job to explore various details such as job properties, job definition, job exceptions, and more.
After a policy is created, it can be used to scan the volume for threats, either manually or as per the defined schedule.
#DataProtection