Kerberos Authentication Setup for VMware ESXi NFS 4.1 with Hitachi VSP One File
Introduction
As organizations scale their virtual infrastructure, enforcing secure and centralized authentication becomes a critical part of storage management. This blog highlights how Kerberos authentication with NFS 4.1 enables secure, identity-verified access from VMware ESXi to Hitachi Vantara VSP One File systems. By implementing the krb5 model, enterprises can achieve secure NFS communication through Kerberos-based identity validation, offering a balance between strong security and optimal performance for production workloads.
Why Use Kerberos Authentication?
Kerberos offers secure, centralized identity verification for NFS 4.1 access, replacing less secure methods like AUTH_SYS. When integrated with VMware ESXi and Hitachi VSP One File, it ensures authenticated access, reduces security risks, and aligns with enterprise authentication and compliance standards.
Infrastructure Architecture Overview
Below diagram shows the environment for Kerberos authentication, where the VMware ESXi host is joined to the Active Directory(AD) domain. DNS services from AD handle forward and reverse lookups, while the ESXi host connects to the Hitachi VSP One File storage system over NFS 4.1 using Kerberos authentication.
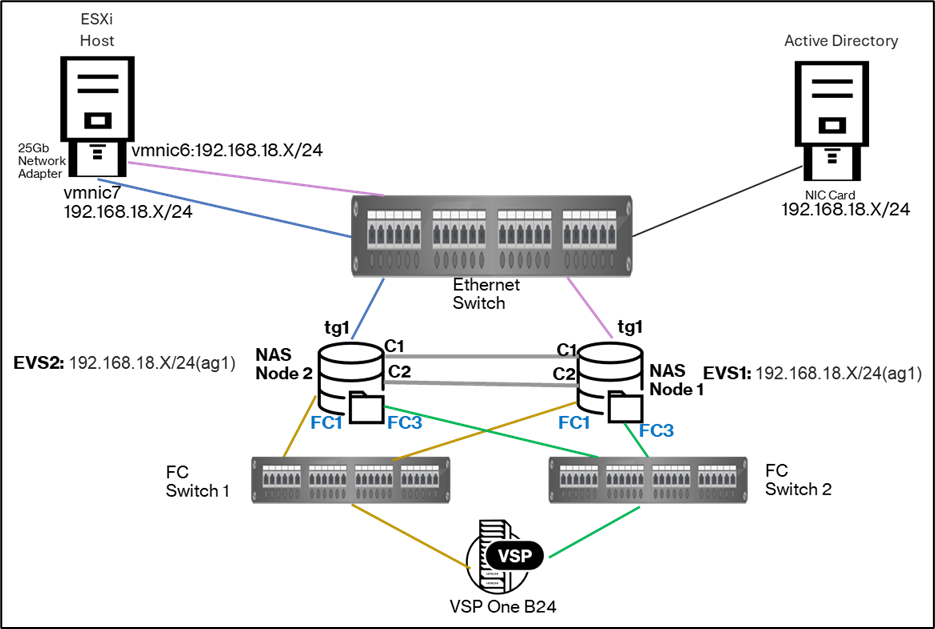
Resources used in this environment:
· ESXi Host: Equipped with a dual-port 25 Gb network adapter.
· Ethernet Switch: Provides connectivity between the ESXi host, NAS server, and Active Directory server.
· Backend Storage: Hitachi VSP One B24, serving as the disk storage for the NAS server.
· Fibre Channel (FC) Switches: Two switches providing SAN connectivity to the datacenter storage network.
· NAS System: Hitachi VSP One File 34 Nodes running NAS OS 15.5.8424.03.
· Virtual SMU (classic): A virtual machine based on a more secure CentOS Stream 9, running 15.5.8424.03 that is used to configure and monitor the cluster.
· Management Host: vCenter Server for centralized virtualization management of the ESXi host.
· Active Directory Server: Windows Server 2022 provides Kerberos authentication.
PrerequisiteS
Before starting the Kerberos configuration for NFS, make sure the following prerequisites are in place:
- Windows Server 2008 or later as the Active Directory (Domain Controller) with AES encryption enabled.
- Create an AD service account (Kerberos principal) for the ESXi host with AES128/256 support.
- Join the ESXi host to the Active Directory domain.
- Ensure time synchronization between ESXi, Domain Controller, and NFS server.
- Proper DNS resolution and reverse lookup for the ESXi host and storage system.
Kerberos configuration on VSP One File
To enable Kerberos authentication on Hitachi VSP One File for NFS 4.1, follow the steps outlined below:
- Get Enterprise Virtual Server(EVS) list to select proper EVS ID:
NAS-2NCluster-2:$ evs list
Node EVS ID Type Label Enabled Status IP Address Port
---- ------ ------- --------------- ------- ------ ----------------- ----
1 Cluster NAS-2NCluster-1 Yes Online 172.23.x.x eth1
1 1 Service EVS1 Yes Online 192.168.18.9 ag1
2 Cluster NAS-2NCluster-2 Yes Online 172.23.x.y eth1
2 0 Admin CH2-node2 Yes Online 172.23.x.z eth1
2 2 Service EVS2 Yes Online 192.168.18.19 ag1
- Select the required EVS ID. For our case we selected EVS 1.
NAS-2NCluster-2:$ evssel 1
- Change the EVS 1 security status from Global(default) to Individual.
NAS-2NCluster-2[EVS1]:$ evs disable -e 1 -c
NAS-2NCluster-2[EVS1]:$ evs-security individual -e 1
NAS-2NCluster-2[EVS1]:$ evs enable -e 1
NAS-2NCluster-2[EVS1]:$ evs-security list
NAS-2NCluster-2:$ evs-security list
EVS id Per EVS security status
------ -----------------------
1 individual
2 global
NAS-2NCluster-2:$
- Add Domain Name System(DNS) Server
NAS-2NCluster-1[EVS1]:$ dnsserver add 192.168.18.15
NAS-2NCluster-1[EVS1]:$
NAS-2NCluster-2[EVS1]:$ dnsserver list
DNS servers
-----------
192.168.18.15
NAS-2NCluster-2[EVS1]:$
- Add CIFS Name for Active Directory Integration
NAS-2NCluster-1[EVS1]:$ cifs-name add -m ads -a 192.168.18.15 NAS-2NCLUSTER-EVS1
Adding name(s) to ADS domain vmcert.com
Please enter account with administrative rights in domain.
User name: Administrator
Password: **********
Adding names to EVS 1 and to CIFS domain "vmcert.com"
JoinDomain: Creating acct "NAS-2NCLUSTER-EVS1" using LDAP
* Added name(s) to ADS domain vmcert.com.
[cifs-name took 14 s.]
NAS-2NCluster-1[EVS1]:$
- Change the security Mode from Unix(default) to Mixed.
NAS-2NCluster-2[EVS1]:$ security-mode set mixed
Security mode: Mixed
NT domain name: VMCERT
ADS domain: vmcert.com
NAS-2NCluster-2[EVS1]:$
- Add NFS Service Hostname on VSP One File.
NAS-2NCluster-1[EVS1]:$ nfs-hostname NAS-2NCluster-EVS1.vmcert.com
NFS service hostname: NAS-2NCluster-EVS1.vmcert.com
NAS-2NCluster-1[EVS1]:$
- Set the maximum NFS protocol version supported as 4.1.
NAS-2NCluster-1[EVS1]:$ nfs-max-supported-version 4.1
nfs-max-supported-version:4.1
NAS-2NCluster-1[EVS1]:$ domain-mappings-add --nt VMCERT --nfsv4 vmcert.com --kerberos VMCERT.COM
NAS-2NCluster-1[EVS1]:$ domain-mappings-list
Unix NT domain NFSv4 domain Kerberos realm
---- --------- ------------ --------------
VMCERT vmcert.com VMCERT.COM
- Add HNAS User Account to Active Directory
Follow the steps below:
a. Launch Active Directory Users and Computers.
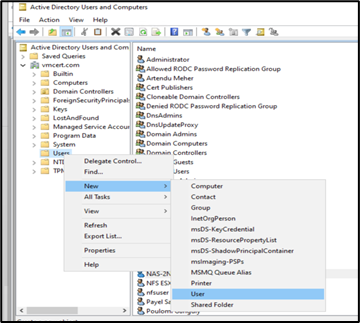
b. Create a new user (e.g., NAS-2NCLUSTER-EVS1).

c. Assign a strong password and enable the options:
· Password never expires
· User cannot change password
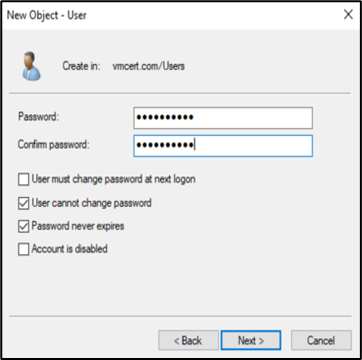
d. After creation, go to the Account tab and ensure that both AES 128-bit and AES 256-bit encryption options are checked. 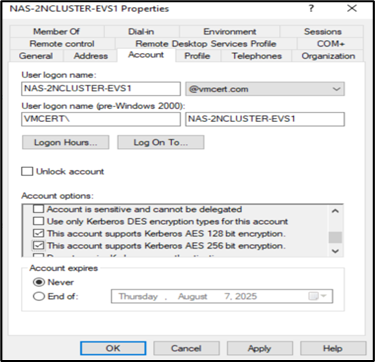
- Generate a Keytab for NFS Kerberos Authentication via Active Directory
Run the following command in Administrator PowerShell:
ktpass -princ nfs/NAS-2NCLUSTER-EVS1.vmcert.com@VMCERT.COM -mapuser VMCERT\NAS-2NCLUSTER-EVS1 -crypto all +rndPass -ptype KRB5_NT_SRV_HST -out NAS-2NCLUSTER-EVS1.keytab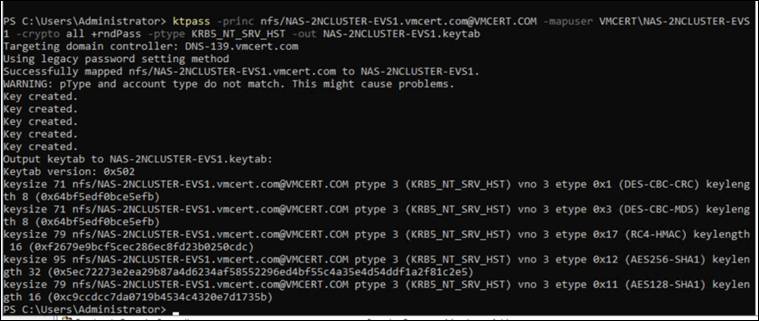
- Copy the Keytab file from Active Directory server to SMU /home/manager to your NFS server.
- Then upload the generated Kerberos Keytab file into the NAS security store so the system has it available.
NAS-2NCluster-1[EVS1]:$ ssput NAS-2NCLUSTER-EVS1.keytab NAS-2NCLUSTER-EVS1.keytab
Wrote 417 B in 43 ms at 9.47 KB/s (9697 B/s)
Transferred local file NAS-2NCLUSTER-EVS1.keytab to server file NAS-2NCLUSTER-EVS1.keytab
- Imports that uploaded Keytab into the Kerberos configuration of the NAS EVS
NAS-2NCluster-1[EVS1]:$ krb5-keytab import NAS-2NCLUSTER-EVS1.keytab
NAS-2NCluster-1[EVS1]:$ krb5-keytab list
Service Principal Key Version Encryption Type
-------------------------------------------- ----------- ------------------------------
nfs/NAS-2NCLUSTER-EVS1.vmcert.com@VMCERT.COM 3 DES: CBC-CRC
nfs/NAS-2NCLUSTER-EVS1.vmcert.com@VMCERT.COM 3 DES: CBC-MD5
nfs/NAS-2NCLUSTER-EVS1.vmcert.com@VMCERT.COM 3 RC4: HMAC-MD5
nfs/NAS-2NCLUSTER-EVS1.vmcert.com@VMCERT.COM 3 AES256: HMAC-SHA1-96
nfs/NAS-2NCLUSTER-EVS1.vmcert.com@VMCERT.COM 3 AES128: HMAC-SHA1-96
5 entries
NAS-2NCluster-1[EVS1]:$
- Restart the EVS to take effect:
NAS-2NCluster-1[EVS1]:$ evs restart -e 1
Do you want to proceed?(Y/N)[N]:
Y
[evs took 8 s.]
NAS-2NCluster-1[EVS1]:$
NAS-2NCluster-1[EVS1]:$ filesystem-create Nas-cert-pool-2 Shared41NFS5 200 0
Creating the filesystem...
Success
Permanent ID: 0x2095c738420d8c28
Device ID: 1044
Capacity: 197GiB
Span Nas-cert-pool-2 is 54% full.
NAS-2NCluster-1[EVS1]:$
- Format and Mount was performed from vSMU UI
- Create export in the vSMU UI

NAS-2NCluster-1[EVS1]:$ nfs-export list
Export name: /export2
Export path: /export2
File system label: Shared41NFS5
File system size: 196.5 GB
File system free space: 192.6 GB
File system state:
formatted = Yes
mounted = Yes
failed = No
thin provisioned = No
Access snapshots: Yes
Display snapshots: Yes
Read Caching: Disabled
Disaster recovery setting:
Recovered = No
Transfer setting = Use file system default
Export configuration:
*(sec=sys:krb5,rw,norootsquash)
Kerberos configuration workflow in vSphere
This workflow outlines the steps required to configure Kerberos for NFS 4.1 datastores in vSphere, ensuring secure access with authentication, integrity, and optional encryption.
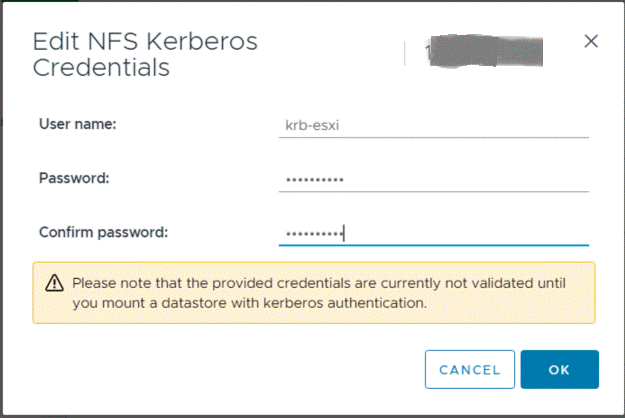
- At first create a dedicated user account in Active Directory for the ESXi server, similar to the account previously created for HNAS. This account will serve as the NFS Kerberos credential for ESXi server.
- Set Unix attributes of the User Account for ESXi server like uid and uidNumber.
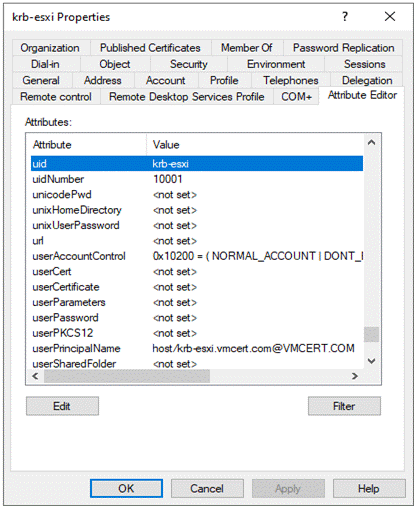
- Generate Keytab for ESXi Host Kerberos Authentication. For that run the command on the AD domain controller with administrative privileges.
ktpass -princ host/krb-esxi.vmcert.com@VMCERT.COM -mapuser VMCERT\KRB-ESXI -crypto all -pass <password> -ptype KRB5_NT_PRINCIPAL -out krb-esxi.keytab
The above command generates a Keytab file that maps the ESXi host’s Kerberos principal to its Active Directory account, enabling secure passwordless authentication.
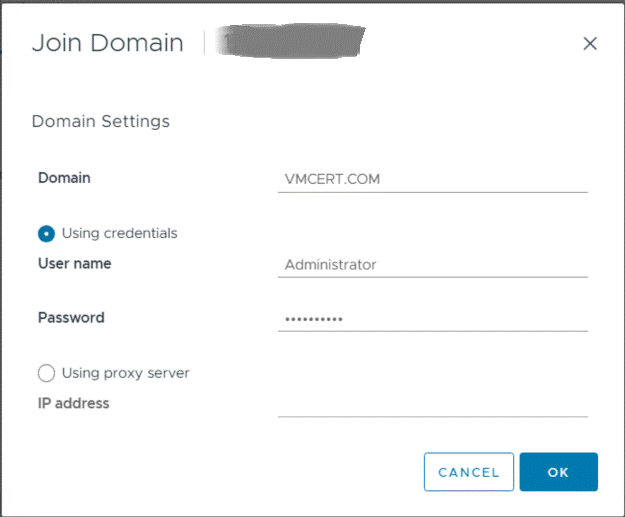
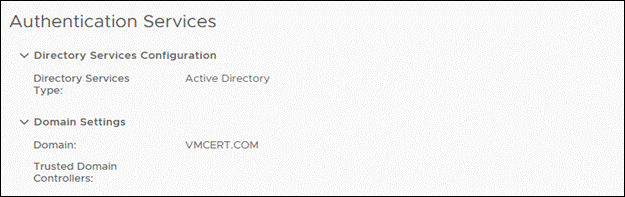
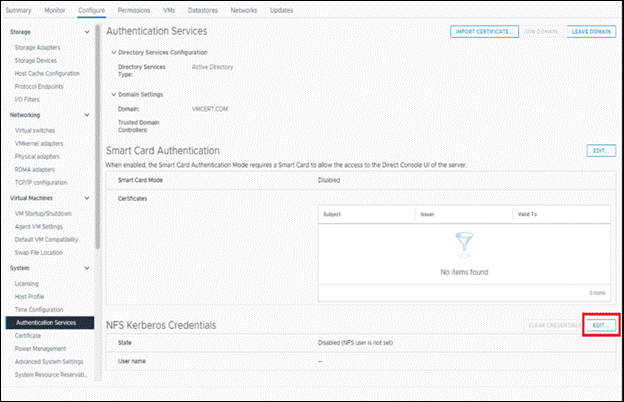
- Open the vSphere Client and select the ESXi host that you want to configure for Kerberos authentication then do the following:
§ Go to Authentication Services under Configure tab
§ Join Active Directory Domain.
-
-
- Add NFS Kerberos Credentials
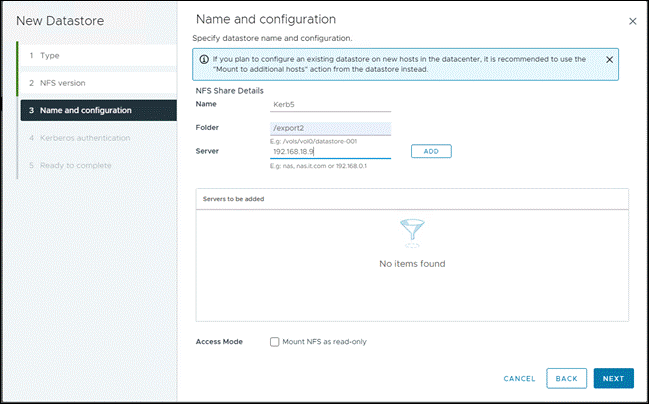
- After that you can add NFS 4.1 datastore with Kerberos 5 authentication.
-
-
- Choose the datastore type as NFS
- Choose the NFS version as NFS 4.1
- Fill out NFS Share Details
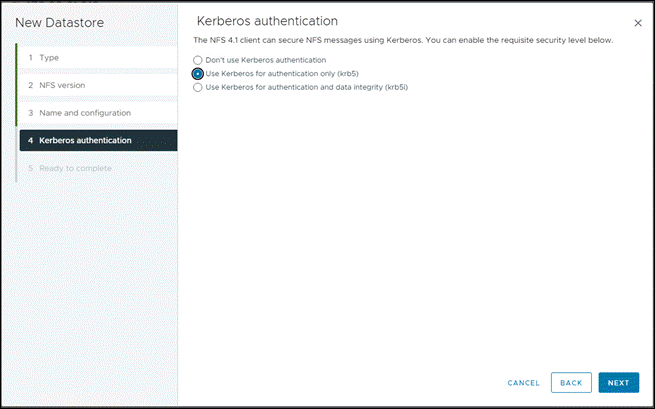
- Choose the Kerberos Authentication(krb5)
-
-
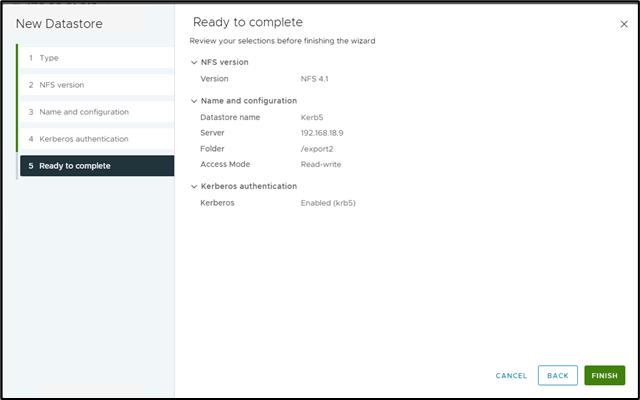
- Now review selection and Finish it.
-
-
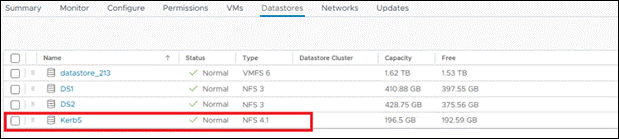
- Finally, datastore is being created.
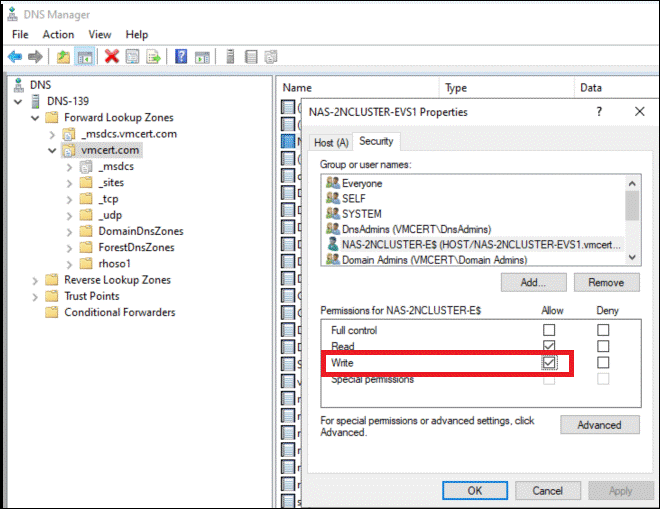
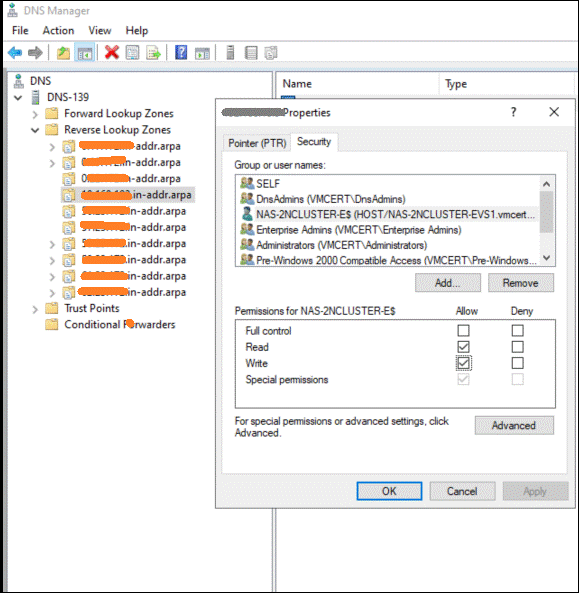
- If the datastore isn’t writable after creation, open the DNS Manager on the Active Directory server. In both the forward and reverse lookup zones, update the host security settings to grant write access. Refer to the example shown below for forward and reverse lookup configuration.
Conclusion
Enabling Kerberos authentication for NFS 4.1 access from VMware ESXi to Hitachi VSP One File brings together enterprise-grade security and high-performance file services. By leveraging Active Directory integration, this setup ensures that datastore access is tightly controlled, authenticated, and protected with options for integrity and encryption. The result is a secure and resilient foundation for running sensitive and mission-critical workloads on VMware infrastructure, while taking full advantage of the scalability and efficiency of Hitachi VSP One File storage.
References
The following URLs provide additional information and resources:
Using Kerberos for NFS 4.1 with ESXi
Kerberos configuration • File Service Administration Guide for Hitachi NAS Platform • Reader • Hitachi Vantara Documentation Portal