Overview & Objectives:
This blog offers a comprehensive, step-by-step guide for provisioning Fibre Channel Non-Volatile Memory Express (FC-NVMe) storage disks—specifically Non-DRS volumes—from the Hitachi Virtual Storage Platform One Block 20 (VSP One B20) family to IBM POWER servers running the IBM AIX operating system, using Hitachi RAID Manager (CCI).
Beyond basic provisioning, this guide explores essential configuration tasks, including:
· Setting up multipathing for high availability
· Modifying default device parameters in the Hitachi AIX Object Data Manager (ODM)
· Configuring SAN boot environments
· Creating volume groups and file systems
The blog is designed to provide a practical, end-to-end roadmap for administrators and engineers working with Hitachi VSP One B20 storage in AIX environments.
Introduction:
In this guide, we outline a structured approach for configuring the Hitachi VSP One B20 family for seamless integration with IBM AIX servers. Leveraging Hitachi RAID Manager (CCI), the blog walks through the complete storage management and provisioning process, including:
- Activating FC-NVMe ports
- Configuring subsystem IDs
- Provisioning NVMe namespaces
- Creating and mapping volumes
- Attaching hosts
- Implementing native NVMe multipathing (MPIO) on AIX systems
All host-to-storage communication occurs over a Fibre Channel SAN, ensuring high-speed, low-latency data transfer.
The VSP One B20 platform represents a modern, 2U all-flash NVMe midrange storage solution available in three models:
- VSP One Block 24 (B24)
- VSP One Block 26 (B26)
- VSP One Block 28 (B28)
Engineered with advanced features such as Dynamic Drive Protection (DDP), Adaptive Data Reduction (ADR), and an energy-efficient architecture, the VSP One B20 ensures optimal performance, robust data protection, and efficient storage utilization—making it a powerful choice for enterprise environments.

All models have the same capacity (72 NVMe flash drives per appliance, plus 2 media trays) and support FC (32G and 64G), 25 GbE iSCSI, 100 Gb NVMe/TCP connectivity, and 32G/64G FC-NVMe. The new capabilities simplify operations by removing complexity: data reduction is always enabled, Dynamic Drive Protection (DDP) eliminates the need for complicated RAID configurations, and Dynamic Carbon Reduction provides tangible reductions in power consumption.
The hardware and features of VSP One Block 20 include:
- VSP One Block 24 – 256 GB Cache + Software Advanced Data Reduction (ADR) + 24 cores
- VSP One Block 26 – 768 GB Cache + 2× Compression Accelerator Modules (CAM) + 24 cores
- VSP One Block 28 – 1 TB Cache + 4× CAM + 64 cores
- Embedded UI (VSP One Block Administrator) and Virtual Storage Scale-Out enhancements
- Thin Image Advanced Data and Ransomware Protection with Safe Snap
Connectivity Diagram:
The following diagram illustrates the test environment for the FC-NVMe configuration in AIX with VSP One Block 20:
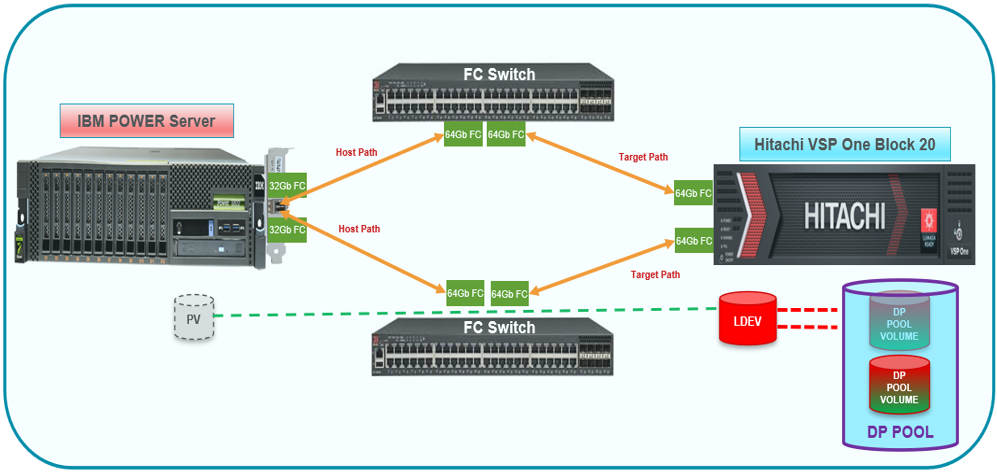
Figure 1: Test Environment for FC Configuration in AIX with VSP One Block 20
Hardware Requirements:
The table below summarizes the hardware specifications used in the validation:
|
Item
|
Description
|
|
Storage System
|
Hitachi VSP One Block 20; Port: 64Gbps FC
|
|
Server
|
IBM POWER 9105-22B
|
|
HBA Model
|
IBM EN1A/EN1B
|
|
HBA Firmware
|
v14.0.574.7
|
|
Switch Model
|
Brocade G720 and Cisco MDS 9124v
|
|
Switch Firmware
|
Firmware Version v9.2.0a
Firmware Version v9.3(2a)
|
Software Requirements:
The following table lists the software specifications used in the validation:
|
Item
|
Description
|
|
Operating System
|
IBM AIX 7.3 TL01
|
|
Hitachi Raid manager (CCI)
|
Command Control Interface, Ver & Rev: 01-76-02/02
|
|
Multipath
|
Multi-Path I/O (AIX NVMe Native MPIO)
|
Configuring the Storage System:
This section provides guidance on setting up the VSP One Block 20 NVM Subsystem using CCI. For comprehensive details on installation, system configuration, and available CCI commands, consult the Hitachi RAID Manager manuals.
Configuring CCI:
To configure CCI, install the CCI software on an AIX host or another supported platform such as Linux or Windows. In this example, a Linux host was used as the CCI server.
Before starting the horcm instance, configure the horcm file on the CCI management server using the IP address of a storage-embedded management node. The CCI server must be running version 01-75-03/03 or later.
For comprehensive guidance on CCI installation, configuration, and commands, consult the Command Control Interface manuals.
The following example illustrates a CCI configuration file for a Linux system:
# Display the CCI configuration file
# cat horcm6817.conf
HORCM_MON
# IP_ADDRESS SERVICE POLL(ms) TIMEOUT(ms)
127.0.0.1 horcm6817 1000 3000
HORCM_CMD
\\.\IPCMD-172.xx.xx.xx-31001
# Verify the service in /etc/services
# cat /etc/services | grep horcm6817
horcm6817 485234/udp # horcm6817
# Start the HORCM instance
# horcmstart.sh 6817
Starting HORCM instance 6817...
HORCM instance 6817 started successfully.
Storage Port Settings:
1. Verify the current settings of the storage ports and remove any existing FC-SCSI configurations from the ports as follows:
[Linux-CCI]# raidcom get port -key detail -IH6817 |grep CL1-C
CL1-C FIBRE TAR AUT EF Y PtoP Y 0 810003 50060e8028271300 - SCSI 0 -
CL1-C FIBRE MCU AUT EF Y PtoP Y 0 810003 50060e8028271300 - SCSI 0 -
CL1-C FIBRE RCU AUT EF Y PtoP Y 0 810003 50060e8028271300 - SCSI 0 -
CL1-C FIBRE ELUN AUT EF Y PtoP Y 0 810003 50060e8028271300 - SCSI 0 -
[Linux-CCI]# raidcom get port -key detail -IH6817 |grep CL2-C
CL2-C FIBRE TAR AUT D9 Y PtoP Y 0 810003 50060e8028271310 - SCSI 0 -
CL2-C FIBRE MCU AUT D9 Y PtoP Y 0 810003 50060e8028271310 - SCSI 0 -
CL2-C FIBRE RCU AUT D9 Y PtoP Y 0 810003 50060e8028271310 - SCSI 0 -
CL2-C FIBRE ELUN AUT D9 Y PtoP Y 0 810003 50060e8028271310 - SCSI 0 –
2. Change the port mode of ports CL1-C and CL2-C, and verify that the port mode is configured as NVMe, as follows:
[Linux-CCI]#raidcom modify port -port CL1-C -port_mode nvme -request_id auto -IH6817
REQID : 1
[Linux-CCI]#raidcom modify port -port CL2-C -port_mode nvme -request_id auto -IH6817
REQID : 2
[Linux-CCI]#
[Linux-CCI]#raidcom get port -key detail -IH6817 |grep CL1-C
CL1-C FIBRE TAR AUT EF Y PtoP Y 0 810003 50060e8028271300 - NVME
[Linux-CCI]#raidcom get port -key detail -IH6817 |grep CL2-C
CL2-C FIBRE TAR AUT D9 Y PtoP Y 0 810003 50060e8028271310 - NVME
3. Configure the FC storage ports by changing the port topology to Fabric ON and Point-to-Point (P-to-P), enabling port security, and registering the HBA WWN using the RAID Manager command, as illustrated in the following output:
[Linux-CCI]#raidcom modify port -port CL1-C -port_speed 0 -topology f_port -security_switch y -IH6817
[Linux-CCI]#raidcom modify port -port CL2-C -port_speed 0 -topology f_port -security_switch y -IH6817
[Linux-CCI]#raidcom get port -key detail -IH6817 |grep CL1-C
CL1-C FIBRE TAR AUT EF Y PtoP Y 0 810003 50060e8028271300 - NVME
[Linux-CCI]#raidcom get port -key detail -IH6817 |grep CL2-C
CL2-C FIBRE TAR AUT D9 Y PtoP Y 0 810003 50060e8028271310 - NVME
4. Assign HBA WWPN to the storage ports as follows:
[Linux-CCI]#raidcom add hba_wwn -port CL1-C -hba_wwn 100000620b428aed -IH6817
[Linux-CCI]#raidcom add hba_wwn -port CL2-C -hba_wwn 100000620b428aee -IH6817
5. Verify that the HBA WWPN is assigned to storage ports CL1-C and CL2-C as follows:
Linux-CCI]#raidcom get hba_wwn -port CL1-C -IH6817
PORT GID GROUP_NAME HWWN Serial# NICK_NAME
CL1-C 0 3A-G00 100000620b428aed 810003 -
Linux-CCI]#raidcom get hba_wwn -port CL2-C -IH6817
PORT GID GROUP_NAME HWWN Serial# NICK_NAME
CL2-C 0 4A-G00 100000620b428aee 810003 -
Linux-CCI]#
Configuring the NVMe Subsystem:
Create an NVMe subsystem on the storage system according to the host operating system mode. First, verify if any NVMe subsystems already exist, and then create a new NVMe subsystem using an available ID.
1. Check for the presence of any existing NVMe subsystems as shown below:
Linux-CCI]#raidcom get nvm_subsystem -key opt -IH6817
2. If no existing NVMe subsystem is found, create a new one with ID 1, name VSP_ONE_NVME_AIX_32G, and host mode set to AIX.
Linux-CCI]#raidcom add nvm_subsystem -nvm_subsystem_id 1 -nvm_subsystem_name VSP_ONE_NVME_AIX_32G -host_mode AIX -request_id auto -IH6817
REQID : 3
Linux-CCI]#
Linux-CCI]#raidcom get nvm_subsystem -key opt -IH6817
NVMSS_ID NVMSS_NAME NVMSS_NQN
1 VSP_ONE_NVME_AIX_32G nqn.1994-04.jp.co.hitachi:nvme:storage-subsystem-sn.8-10003-nvmssid.00001
[Linux-CCI]#
[Linux-CCI]#raidcom get nvm_subsystem -nvm_subsystem_id 1 -IH6817
NVMSS_ID RGID NVMSS_NAME SECURITY T10PI HMD HMO_BITs
1 0 VSP_ONE_NVME_AIX_32G ENABLE DISABLE AIX -
[Linux-CCI]#
3. Register the NVMe subsystem ports for storage ports CL1-C and CL2-C using NVMe Subsystem ID 1.
[Linux-CCI]#raidcom get nvm_subsystem_port -nvm_subsystem_id 1 -IH6817
[Linux-CCI]#raidcom add nvm_subsystem_port -nvm_subsystem_id 1 -port CL1-C -request_id auto -IH6817
REQID : 4
[Linux-CCI]#raidcom add nvm_subsystem_port -nvm_subsystem_id 1 -port CL2-C -request_id auto -IH6817
REQID : 5
[Linux-CCI]#raidcom get nvm_subsystem_port -nvm_subsystem_id 1 -IH6817
PORT NVMSS_ID NVMSS_NAME
CL1-C 1 VSP_ONE_NVME_AIX_32G
CL2-C 1 VSP_ONE_NVME_AIX_32G
[Linux-CCI]#
4. Configure the namespace security settings as outlined below:
a. On the AIX host, verify and list the FC-NVMe protocol devices using the following command:
P10-LPAR1>lsdev | grep fcnvme
fcnvme0 Available 01-00-02 FC-NVMe Protocol Device
fcnvme1 Available 01-01-02 FC-NVMe Protocol Device
P10-LPAR1>
5. Configure the namespace security settings as follows:
b. Verify and list the FC-NVMe protocol devices on the AIX host using the following command:
P10-LPAR1>lsdev | grep fcnvme
fcnvme0 Available 01-00-02 FC-NVMe Protocol Device
fcnvme1 Available 01-01-02 FC-NVMe Protocol Device
P10-LPAR1>
c. On the AIX server, display the host NQN using the following command:
P10-LPAR1>lsattr -El fcnvme0
attach switch How this adapter is connected False
autoconfig available Configuration State True
host_nqn nqn.2014-08.org.nvmexpress:uuid:154c6f3f-3471-454d-9e4a-6b7ef18948ac Host NQN (NVMe Qualified Name) True
P10-LPAR1>
d. To allow access to the NVMe subsystem, register the host NQN on the NVMe subsystem. For this setup, configure Host NQN (nqn.2014-08.org.nvmexpress:uuid:154c6f3f-3471-454d-9e4a6b7ef18948ac) on NVMe Subsystem ID 1."
[Linux-CCI]#raidcom get host_nqn -nvm_subsystem_id 1 -IH6817
[Linux-CCI]#raidcom add host_nqn -nvm_subsystem_id 1 -host_nqn nqn.2014-08.org.nvmexpress:uuid:154c6f3f-3471-454d-9e4a-6b7ef18948ac -request_id auto -IH6817
REQID : 6
[Linux-CCI]#
[Linux-CCI]#raidcom get host_nqn -nvm_subsystem_id 1 -IH6817
Mon Dec 11 06:55:07 UTC 2023
NVMSS_ID NVMSS_NAME HOST_NQN
1 VSP_ONE_NVME_AIX_32G nqn.2014-08.org.nvmexpress:uuid:154c6f3f-3471-454d-9e4a-6b7ef18948ac
[Linux-CCI]#
Creating a Namespace:
Create a namespace by registering the LDEV with the NVMe subsystem. This process assigns a unique Namespace ID to the LDEV, creating a dedicated namespace.
1. Prior to assigning the LDEV as a namespace in the NVMe subsystem, execute the following command to view the hard disk details of the storage system:
[Linux-CCI]# raidcom get drive -IH6817
LOCATION TYPE RPM TOTAL_CAP(GB) CODE USAGE STS GROUP
0-0 SSD - 1900 SNB5B-R1R9NC DATA NML 1-1
0-8 SSD - 1900 SNB5B-R1R9NC FREE NML -
2. Create a parity group as follows:
[Linux-CCI]# raidcom add parity_grp -parity_grp_id 1-2 -drive_location 0-8 0-9 0-10 0-11 0-12 0-13 0-14 0-15 -raid_type 6D2P -encryption disable -copy_back disable -IH6817
[Linux-CCI]# raidcom get parity_grp -IH6817
T GROUP Num_LDEV U(%) AV_CAP(GB) R_LVL R_TYPE SL CL DRIVE_TYPE M E_TYPE
R 1-1 259 50 5269 RAID6 6D+2P 0 0 SNR5A-R1R9NC N OPEN-V
R 1-2 0 0 10563 RAID6 6D+2P 0 0 SNR5A-R1R9NC N OPEN-V
[root@ilab-cci ~]#
3. Verify the free LDEV ID and then create two LDEVs from Parity Groups 1-2. In this scenario, the LDEV IDs are 08:50 and 08:51.
[Linux-CCI]# raidcom add ldev -ldev_id 08:50 -parity_grp_id 1-2 -capacity 100G -IH6817
[Linux-CCI]# raidcom add ldev -ldev_id 08:51 -parity_grp_id 1-2 -capacity 100G -IH6817
4. Format LDEVs by running the following command:
[Linux-CCI]# raidcom initialize ldev -ldev_id 08:50 -operation fmt -IH6817
[Linux-CCI]# raidcom initialize ldev -ldev_id 08:51 -operation fmt -IH6817
5. To check the available DP Pool in the storage system, run the following command:
[Linux-CCI]# raidcom get pool -key opt -IH6817
[Linux-CCI]#
No DP Pool is available.
6. To create the DP Pool and add the LDEV in the DP Pool, run the following commands:
[Linux-CCI]# raidcom add dp_pool -pool_name VSP_ONE_B28_AIX_32G_NVMe -ldev_id 08:50 -IH6817
raidcom: Pool ID 0(0x0) will be assigned for adding.
[Linux-CCI]#
[Linux-CCI]# raidcom get pool -key opt -IH6817
PID POLS U(%) POOL_NAME Seq# Num LDEV# H(%) VCAP(%) TYPE PM PT AUTO_ADD_PLV
000 POLN 0 VSP_ONE_B28_AIX_32G_NVMe 810003 1 6656 80 - OPEN N HDP E
[Linux-CCI]#
[Linux-CCI]# raidcom add dp_pool -pool_id 0 -pool_name VSP_ONE_B28_AIX_32G_NVMe -ldev_id 08:51 -IH6817
[Linux-CCI]#
[Linux-CCI]# raidcom get pool -key opt -IH6817
PID POLS U(%) POOL_NAME Seq# Num LDEV# H(%) VCAP(%) TYPE PM PT AUTO_ADD_PLV
000 POLN 0 VSP_ONE_B28_AIX_32G_NVMe 810003 2 6656 80 - OPEN N HDP E
[Linux-CCI]
7. Create the LDEV from the DP Pool and format the LDEVs as follows:
[Linux-CCI]# raidcom add ldev -pool 0 -ldev_id 1B:00 -capacity 20971520 -IH6817
[Linux-CCI]# raidcom add ldev -pool 0 -ldev_id 1B:01 -capacity 20971520 -IH6817
[Linux-CCI]#
[Linux-CCI]# raidcom initialize ldev -ldev_id 1B:00 -operation fmt -IH6817
[Linux-CCI]# raidcom initialize ldev -ldev_id 1B:01 -operation fmt -IH6817
[Linux-CCI]#
8. Register the newly created LDEVs as namespaces within the NVMe subsystem. In the example below, LDEV IDs 1B:00 and 1B:01 are added to NVMe Subsystem ID 1:
[Linux-CCI]# raidcom add namespace -nvm_subsystem_id 1 -ns_id auto -ldev_id 1B:00 -request_id auto -IH6817
REQID : a92
[Linux-CCI]# raidcom add namespace -nvm_subsystem_id 1 -ns_id auto -ldev_id 1B:01 -request_id auto -IH6817
REQID : a93
[Linux-CCI]#
9. Verify the Namespace information assigned to NVM Subsystem ID 1 as follows:
[Linux-CCI]#raidcom get namespace -nvm_subsystem_id 1 -IH6817
[Linux-CCI]#
[Linux-CCI]#raidcom get namespace -nvm_subsystem_id 1 -IH6817
NVMSS_ID NVMSS_NAME NSID LDEVID CAPACITY(BLK)
1 VSP_ONE_NVME_AIX_32G 1 6912 20971520
1 VSP_ONE_NVME_AIX_32G 2 6913 20971520
Configuring Namespace Path Settings:
To enable the host to discover and access a namespace, first register the host NQN with the NVMe subsystem namespace (NSID). Then, configure the namespace path settings by performing the following steps:
1. Register the Host NQN to the Namespace on the NVM Subsystem ID 1 as follows:
[Linux-CCI]#raidcom get host_nqn -nvm_subsystem_id 1 -IH6817
[Linux-CCI]#raidcom add namespace_path -nvm_subsystem_id 1 -ns_id 1 -host_nqn nqn.2014-08.org.nvmexpress:uuid:154c6f3f-3471-454d-9e4a-6b7ef18948ac -request_id auto -IH6817
REQID : 17
[Linux-CCI]#raidcom add namespace_path -nvm_subsystem_id 1 -ns_id 2 -host_nqn nqn.2014-08.org.nvmexpress:uuid:154c6f3f-3471-454d-9e4a-6b7ef18948ac -request_id auto -IH6817
REQID : 18
[Linux-CCI]#
2. Verify the Namespace path information for NVM Subsystem ID 1 as follows:
[Linux-CCI]# raidcom get namespace_path -nvm_subsystem_id 1 -IH6817
NVMSS_ID NVMSS_NAME NSID LDEV# HOST_NQN
1 VSP_ONE_NVME_AIX_32G 1 6912 nqn.2014-08.org.nvmexpress:uuid:154c6f3f-3471-454d-9e4a-6b7ef18948ac
1 VSP_ONE_NVME_AIX_32G 2 6913 nqn.2014-08.org.nvmexpress:uuid:154c6f3f-3471-454d-9e4a-6b7ef18948ac
Configuring the Host:
To configure the host, perform the following steps:
- Create an LPAR on the IBM POWER server and install AIX 7.3 TL01 on the local hard disk. After the installation is complete, verify the available HBA and NVMe device details as follows:
P10-LPAR1>oslevel -s
7300-01-02-2320
P10-LPAR1>lsdev | grep -i nvme
fcnvme0 Available 01-00-02 FC-NVMe Protocol Device
fcnvme1 Available 01-01-02 FC-NVMe Protocol Device
P10-LPAR1>
P10-LPAR1>lsdev |grep fcs*
fcnvme0 Available 01-00-02 FC-NVMe Protocol Device
fcnvme1 Available 01-01-02 FC-NVMe Protocol Device
fcs0 Available 01-00 PCIe3 2-Port 32Gb FC Adapter (df1000e314101506)
fcs1 Available 01-01 PCIe3 2-Port 32Gb FC Adapter (df1000e314101506)
P10-LPAR1>
2. Verify the NVMe attributes of the HBA ports as follows:
P10-LPAR1>lsattr -El fcnvme0
attach switch How this adapter is connected False
autoconfig available Configuration State True
host_nqn nqn.2014-08.org.nvmexpress:uuid:154c6f3f-3471-454d-9e4a-6b7ef18948ac Host NQN (NVMe Qualified Name) True
P10-LPAR1>
P10-LPAR1>lsattr -El fcnvme1
attach none How this adapter is connected False
autoconfig available Configuration State True
host_nqn Host NQN (NVMe Qualified Name) True
P10-LPAR1>
P10-LPAR1>lsattr -El fcnvme2
attach switch How this adapter is connected False
autoconfig available Configuration State True
host_nqn nqn.2014-08.org.nvmexpress:uuid:154c6f3f-3471-454d-9e4a-6b7ef18948ac Host NQN (NVMe Qualified Name) True
P10-LPAR1>
P10-LPAR1>
P10-LPAR1>lsattr -El fcnvme3
attach none How this adapter is connected False
autoconfig available Configuration State True
host_nqn Host NQN (NVMe Qualified Name) True
P10-LPAR1>
NVMe Target Discovery from the AIX Host:
1. Run the following cfgmgr command on the AIX host to detect the LDEVs and confirm that the new disks are available:
P10-LPAR1>cfgmgr
P10-LPAR1>
P10-LPAR1>lapath
Enabled hdisk0 vscsi0
Enabled hdisk1 nvme2
Enabled hdisk2 nvme2
Enabled hdisk1 nvme3
Enabled hdisk2 nvme3
P10-LPAR1>
2. Display the path status by running the lsmpio command. In this scenario, the AIX default NVMe Native MPIO is used with all default settings.
P10-LPAR1>lsmpio
name path_id status path_status parent connection
hdisk0 0 Enabled Sel vscsi0 810000000000
hdisk1 0 Enabled Sel nvme2 fcnvme0, 1
hdisk1 1 Enabled Sel nvme3 fcnvme2, 1
hdisk2 0 Enabled Sel nvme2 fcnvme0, 2
hdisk2 1 Enabled Sel nvme3 fcnvme2, 2
Creating a File System in the AIX Host:
To create a file system in the AIX Host, complete the following steps:
1. To create a volume group, logical volume, and filesystem in the AIX Host, run the following commands:
P10-LPAR1>mkvg -f -y datavg -s 256 hdisk2 ; mklv -t jfs2 -a c -y datalv1 datavg 30 ;crfs -v jfs2 -d datalv1 -m /datafs1 -A y -p rw
0516-1254 mkvg: Changing the PVID in the ODM.
datavg
datalv1
File system created successfully.
7833156 kilobytes total disk space.
New File System size is 15728640
P10-LPAR1>
2. To verify that the filesystem is created in the AIX Host, run the following command:
P10-LPAR1> mount /datafs1
P10-LPAR1> df -gt
Filesystem GB blocks Used Free %Used Mounted on
/dev/hd4 2.12 0.13 2.00 7% /
/dev/hd2 2.38 2.15 0.23 91% /usr
/dev/hd9var 2.25 0.03 2.22 2% /var
/dev/hd3 2.12 0.10 2.02 5% /tmp
/dev/hd1 0.12 0.00 0.12 1% /home
/dev/hd11admin 0.12 0.00 0.12 1% /admin
/proc - - - - /proc
/dev/hd10opt 0.12 0.02 0.11 14% /opt
/dev/livedump 0.25 0.00 0.25 1% /var/adm/ras/livedump
/ahafs - - - - /aha
/dev/datalv1 7.50 0.03 7.47 1% /datafs1
#HitachiVantara #Hitachi #VSPOneBlock #VSPOneBlock20Series #StorageManagement #KnowledgeBase