Introduction
As business applications grow and data volumes increase, organizations need faster and more responsive storage systems. Traditional storage communication methods, such as Fibre Channel SCSI (FC-SCSI), have been dependable for many years, but they were designed at a time when storage technology was much slower than it is today. Because of this, they cannot fully take advantage of modern high-speed flash storage.
NVMe over Fibre Channel (FC-NVMe) is a newer approach that allows organizations to use faster storage technology without replacing their existing Fibre Channel network. It helps applications access data more quickly, reduces delays, and improves overall system performance.
Changing storage ports from FC-SCSI to FC-NVMe is a key step in upgrading a storage environment. However, this change must be made carefully to ensure that applications continue to run smoothly without interruptions.
This blog walks through the process in a simple and practical way covering preparation, conversion, and validation so the transition can be completed safely and without disrupting business operations.
The configuration steps have been explained using CCI (Command Control Interface) with raidcom commands.
The same operations can also be performed using other tools, such as Ops Center Administrator. However, certain provisioning steps may vary slightly depending on tool-specific requirements.
Understanding FC-SCSI and FC-NVMe
What is FC-SCSI?
FC-SCSI is a traditional way for servers to communicate with storage systems over a Fibre Channel network. It has been used in enterprise data centers for many years and is known for its stability, reliability, and broad support across different operating systems and applications. However, it was designed for older storage technologies and is not optimized for today’s high-speed flash storage.
What is FC-NVMe?
FC-NVMe is a modern storage communication method built for high-performance flash storage. It allows NVMe commands to travel directly over the Fibre Channel network, removing unnecessary processing layers. This results in faster data access, lower delays, and better performance, especially for demanding applications.
Key Differences Table
|
Feature
|
FC-SCSI
|
FC-NVMe
|
|
Command Set
|
SCSI
|
NVMe
|
|
Latency
|
Higher
|
Ultra-low
|
|
Queue depth
|
Limited
|
Extremely high
|
|
Performance
|
Moderate
|
High
|
|
Optimized for
|
HDD/SSD
|
NVMe SSD
|
Prerequisites and Compatibility Considerations
Before converting storage ports from FC-SCSI to FC-NVMe on Hitachi VSP systems, it is important to confirm that every part of the storage environment is compatible. FC-NVMe depends heavily on correct firmware versions, drivers, and system settings. If these checks are skipped, hosts may fail to detect storage correctly, or applications may experience unexpected interruptions.
Key Requirements
· Hitachi VSP Storage
o VSP model must support FC-NVMe and supported models are 5000 series, E-series (E1090, E1090H), VSP One Block storage (B24, B26, B28) and VSP One High End Storages
o Storage microcode should be at a supported level for FC-NVMe.
o Target ports must be free from SCSI LUN mappings.
· Host Operating System
o Host OS version must support FC-NVMe as per Hitachi compatibility.
o Required FC-NVMe packages must be installed and enabled.
· Host Bus Adapter (HBA) Compatibility
o HBA firmware should be updated to an NVMe-capable version.
o Correct HBA drivers must be installed on the host.
o NVMe features must be enabled on the HBA.
· SAN Switch and Fabric Considerations
o Fibre Channel switches must support FC-NVMe.
o Switch firmware must be validated against vendor interoperability matrices.
o Proper zoning must be configured using WWPN based zoning.
· Multipathing and High Availability
o NVMe multipathing must be supported and enabled on the host.
o Path redundancy should be planned across multiple fabrics.
Pre-Conversion Cleanup Activities
Before converting the port, engineers must ensure that it is completely free from any active SCSI usage. This includes the following checks and cleanup activities:
· Identify and verify all hosts currently connected through the FC-SCSI ports.
· Unmap all the SCSI LUNs associated with the target ports.
· Remove or disable SCSI paths on the connected hosts.
· Remove any LUNs mapped to host groups on the port.
· Delete or detach any active host groups configured on the storage port.
· Confirm that no I/O activity is running on the storage ports.
Storage Port Conversion Procedure: FC-SCSI to FC-NVMe
Before starting the port conversion, engineers must ensure that all SCSI-related configurations and usage have been fully cleaned up by following the steps outlined above.
Begin FC-SCSI to FC-NVMe Configuration Process
1. Verify whether the `horcm` instance is running.
Syntax: To list all `horcm` instance running on CCI server, use the following CCI command:
# ps -eaf | grep horcm

2. Start the `horcm` instance if it is not already running for the storage system where the cleanup is required.
Syntax: To start a specific `horcm` instance, use the following CCI command:
# horcmstart.sh <horcm_instance>

3. Verify that the PORT_MODE is set to SCSI on ports that need to be converted to NVMe.
Syntax: To check whether a port is operating in SCSI mode, use the following CCI command:
# raidcom get port -key detail -<horcm_instance> | awk '$1~/CL7-F|CL8-F/'

4. Revert the port mode to NVMe for the specified ports.
Syntax: To revert the port from SCSI to NVMe, use the following CCI command:
# raidcom modify port -port <storage_port> -port_mode nvme -request_id auto -<horcm_instance>

NOTE: After executing the port modification command, a Request ID is generated. To confirm that the port was successfully converted to NVMe, check the command status using this Request ID.
If the Description field in the output shows a “-”, it indicates that the command completed successfully, as shown in the example below. If the command fails, the Description field will display the corresponding error message.

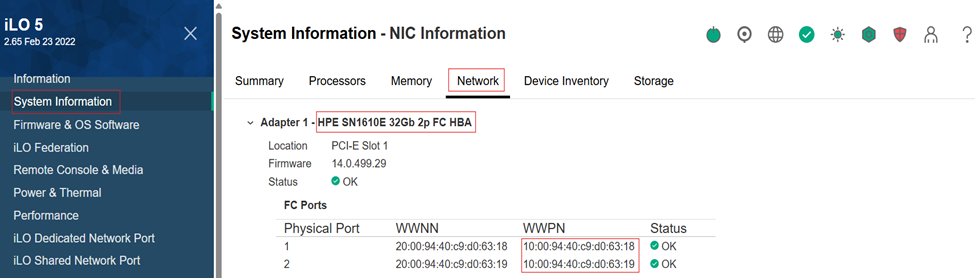
5. Log in to iLO and navigate to System Information → Network. Locate the HBA connected to the server, as shown in the screenshot below, and note down the HBA WWPN for use in the next steps.
6. You can set the FC-NVMe LUN security settings to ON or OFF based on your configuration requirements. In this blog, we enabled LUN security by setting the port security switch to ON and then registering the HBA WWN with the storage ports.
It is recommended to disable the security_switch if you are using Ops Center Administrator to configure FC-NVMe.
Syntax: The following CCI command are used to add the HBA WWN and configure port security on switch:
# raidcom modify port -port <storage_port> -security_switch y -<horcm_instance>
# raidcom add hba_wwn -port <storage_port> -hba_wwn <hba_wwpn> -<horcm_instance>

To validate that the HBA WWPN has been successfully registered with the specified ports, use the following CCI commands:
# raidcom get hba_wwn -port <storage_port> -<horcm_instance>

7. Create an NVM subsystem using an available subsystem ID after verifying existing subsystems.
Syntax: To verify existing subsystems and create an NVM subsystem, use the following CCI command:
# raidcom get nvm_subsystem -key opt -<horcm_instance>
# raidcom add nvm_subsystem -nvm_subsystem_id <available_subsys_id> -request_id auto -<horcm_instance>

NOTE: An NVM subsystem is created with ID 3. After executing the subsystem creation command, a Request ID is generated. Use this Request ID to verify whether the NVM subsystem was added successfully.
If the Description field in the output shows a “-”, it indicates that the command completed successfully, as shown in the example below. If the command fails, the Description field will display the appropriate error message.

8. Modify the NVM subsystem by renaming it with an appropriate task related name, and verify that the rename operation is completed successfully using the generated Request ID.
Syntax: To rename the NVM subsystem, use the following CCI command:
# raidcom modify nvm_subsystem -nvm_subsystem_id <subsys_id> -rename_nvm_subsystem <subsystem_name> -request_id auto -<horcm_instance>


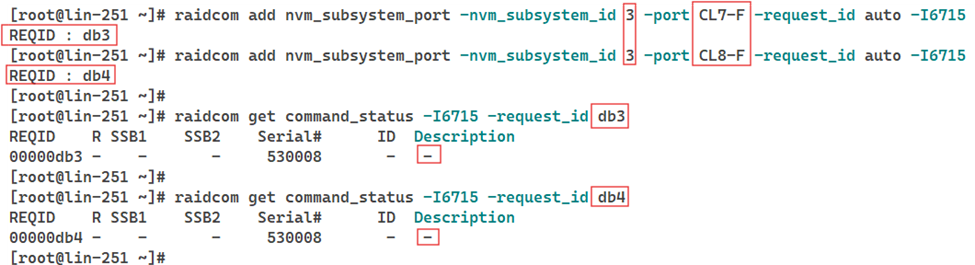
9. Register the specified target ports with the NVM subsystem created in step 7.
Syntax: To add target ports to the NVM subsystem, use the following CCI command:
# raidcom add nvm_subsystem_port -nvm_subsystem_id <subsys_id> -port <target_port> -request_id auto -<horcm_instance>

10. Get the Host NQN from the Linux based server by logging in to the server and navigating to path /etc/nvme/hostnqn and note it for configuration in later step.
Syntax: To get the Host NQN use the following command:
# cat /etc/nvme/hostnqn

11. Link the Host NQN to the NVN subsystem created in step 7 and verify that the association is completed successfully using the generated Request ID.
Syntax: To attach Host NQN to subsystem, use the following CCI command:
# raidcom add host_nqn -nvm_subsystem_id <subsys_id> -host_nqn <host_nqn> -request_id auto -<horcm_instance>

12. Crete a namespace by registering LDEVs with NVM subsystem, which results in a namespace with a unique namespace ID.
Namespaces can be created in two ways: by using free LDEVs that are not part of any host groups, or by creating new LDEVs and then registering them with the NVM subsystem. In this blog, second approach will be used to create two new LDEVs of capacity 10G each, initialize them, and then register it with NVM subsystem to create a namespace.
Syntax: To create new LDEVs, initialize them, and register them with the NVM subsystem, use the following CCI command:
# raidcom add ldev -parity_grp_id <parity_grp> -ldev_id <undefined_ldev> -capacity 10G -<horcm_instance>

# raidcom initialize ldev -ldev_id < undefined_ldev > -operation fmt -<horcm_instance>

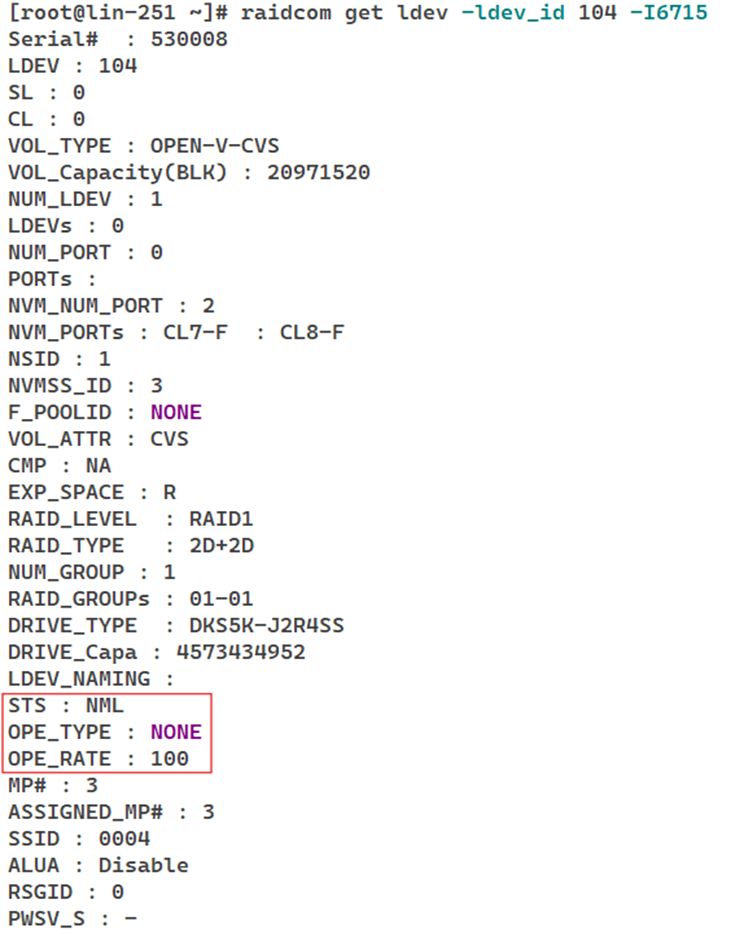
Once the LDEVs are initialized for the format operation, engineers must wait for the format to complete successfully before registering the LDEVs with the NVM subsystem. To confirm that the format operation has finished successfully, the following conditions must be met:
· STS: NML
· OPE_TYPE: NONE
· OPE_RATE: 100
These values can be retrieved using the following CCI command:
# raidcom get ldev -ldev_id < undefined_ldev > -<horcm_instance>
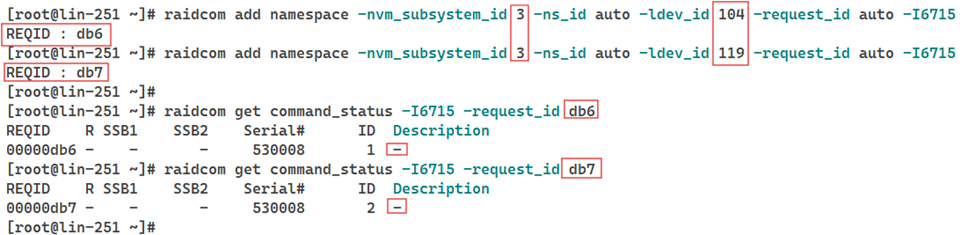
# raidcom add namespace -nvm_subsystem_id <subsys_id> -ns_id auto -ldev_id <undefined_ldev> -request_id auto -<horcm_instance>
13. Verify that the namespaces are successfully created, registered with the corresponding LDEVs, and associated with NVM subsystem.
Syntax: To check the namespaces associated with the NVM subsystem, use the following CCI command:
# raidcom get namespace -nvm_subsystem_id <subsys_id> -<horcm_instance>

14. Register all namespace IDs obtained in step 13 with Host NQN to allow host access.
Syntax: To configure the Host NQN-Namespace path mapping, use the following CCI command:
# raidcom add namespace_path -nvm_subsystem_id <subsys_id> -ns_id <namespace_id> -host_nqn <host_nqn> -request_id auto -<horcm_instance>

15. Verify that the namespace path is successfully configured and associated with the NVM subsystem.
Syntax: To retrieve all the namespace paths, use the following CCI command:
# raidcom get namespace_path -nvm_subsystem_id <subsys_id> -<horcm_instance>

With these steps completed, the storage ports are successfully converted from FC-SCSI to FC-NVMe, and the entire NVMe configuration is fully in place. The environment is now ready to take advantage of improved performance and lower latency offered by FC-NVMe.
Shutdown the `horcm` instance after completing port conversion and NVMe configurations.
Syntax: To stop the `horcm` instance, use the following CCI command:
# horcmshutdown.sh -<horcm_instance>

Conclusion
Transitioning from FC-SCSI to FC-NVMe is a critical step in modernizing enterprise storage architecture and unlocking the full performance capabilities of NVMe type systems. Although the performance gains are substantial, a successful migration requires strict prerequisite validation, complete SCSI cleanup, and careful execution of port conversion and host-side configurations. By following a structured, step-by-step approach, engineers can achieve a stable, efficient, and scalable FC-NVMe setup and configuration.
You may refer to the relevant documentation for more details:
Provisioning Guide: https://docs.hitachivantara.com/r/en-us/svos/10.5.x/mk-26vsp1b033/provisioning-workflows/workflows-for-provisioning-nvme-over-fc/workflow-for-creating-a-host-group-for-nvme-of
CCI Guide: https://docs.hitachivantara.com/r/en-us/command-control-interface/01-87-03/mk-90rd7010/overview
Ops Center Administrator User Guide: https://docs.hitachivantara.com/r/en-us/ops-center-administrator/11.0.x/mk-99adm001/configure-block-storage/managing-port-security-and-settings
#VSPOneBlock
#VSP5000Series
#VSPOneBlockHighEnd
#VSPESeries